KC 315 – Savory Spring Breads

Why hello there, and welcome back to Kitchen Catastrophe, where one man is constantly overwhelmed by a schedule he has complete control over. I’m your Self-Harried Host, Jon O’Guin, and for today’s post, we’re making two recipes of savory bread products in vague honor of the impending Easter Sunday. They’re familiar enough to fit on most holiday tables, cool enough to make anyway if you don’t observe the holiday, and different enough to sate my endless hunger for novelty for a few minutes. You can go to the recipes with this link, for everyone else, let’s dig in.
A Temporal Technicality, and Tasteful Tactics
I do want to acknowledge at the start that this post might be a little late: You may recall I mentioned being press-ganged into shelf-sorting activities a week or two ago. Well, that reached a fever pitch last week, which is why the Thursday post didn’t go up. In my defense, I finished writing it…Saturday night. I’ll see if I can swing a 3-post upload this week, but I may delay it a week, since it’s a little more appropriate for Next Thursday, for reasons that will be obvious when it happens. Suffice to say my schedule is still sorting itself out, and I’m popping the pieces together. So if this is a Tuesday upload instead of a Monday, my apologies.

The weather also kind of lost its shit.
On the plus side, the temporal turmoil should be somewhat alleviated by the pre-planned posts I’ve…man, alright, I want to spoil this right away, just so I can talk about something: The reason I was real busy last week is that I headed over to Leavenworth for a bit this last weekend. I was wrapping up stuff at home before I went. And it was…maybe unwise. Like, it turns out I decided to drive through the mountain-passes mid-mini-blizzard: if I had been 30-45 minutes slower, I wouldn’t have been able to come over, because they CLOSED THE PASS while I was on it. The big thing that’s frustrating me is that since starting this post, I’ve thought of like, 4 things I meant to grab before coming out here. So I might run back on my next day off. I am FIVE YEARS behind on one of my favorite fantasy series, because I was reading Book three when my dad passed, I went kinda blue-screen for a year, and when I snapped out of it, I needed to start the whole book over again…and that book is 1250 pages long. I was about to quip that “my pre-planned posts may give me some time to get some reading done”, and I realized that won’t work, because I DON’T HAVE THE BOOK. So what I’m saying is “don’t try to rob my house while I’m in Leavenworth, because you have no idea on what day my patience might finally snap and I make a 6 hour round trip to get my book.” Which would be an act of madness: the book is like, half the cost of gas for the trip, and I could easily just buy it and donate it to a local library or used book store.
Immediately following that rant, Jon decided he needed to burn off some anger, and continued unpacking, only to discover he did, in fact, bring the book.
Still, don’t rob his house. He’s got other stuff he could go back for at any time.
What was I saying? Oh, right, I was wasting time by being an idiot because I don’t have a ton to talk about with these recipes. They’re pretty straight forward. Let us give them at least SOME attention, though.
Why Don’t You Gochu on Deez NUTS?
Weirdly aggressive, and also somewhat contradictory, Title Jon. Also, I hadn’t referenced gochujang yet, so you’re just confusing people. BUT yes, our first recipe is yet another entry into our “The O’Guins just really like Korean food, okay?” series. Kind of. Honestly, it would not surprise me to learn that this recipe has no actual Korean counterpart, and is a fully American invention. It comes to us courtesy of America’s Test Kitchen, and is “Gochujang and Cheddar Pinwheels”
Pinwheels are an interesting food, in part because, at time of writing, they do not have their own Wikipedia page, despite being something you can find at grocery stores or potlucks around the country, so I guess I’m pioneering the digital definition of a food-stuff. Pinwheels are filled rolled bread dishes, Originally created in England as a form of canapé, in the modern era pinwheels have somewhat evolved, consisting of two options: either a “pinwheel sandwich”, made with a tortilla, or simply a “pinwheel”, made with puff pastry. In the case of a tortilla, a pinwheel sandwich is, effectively, a wrap with some creative flair: the tortilla is covered in thin layers of whatever you want to put in the pinwheel (most commonly some form of sliced deli meat(s), a cheese, and maybe some sauce and/or vegetables), then the tortilla is tightly wrapped on itself, forming a spiral of alternating layers of filling and tortilla, which is then cut into disks, making them essentially showy little sandwich bites. These are sold in the cold deli section of basically every supermarket I’ve ever entered, and if they aren’t, then they had the option to order them ahead of time. They’re food meant to hit the same desire of eating a sandwich, but while keeping one hand free.
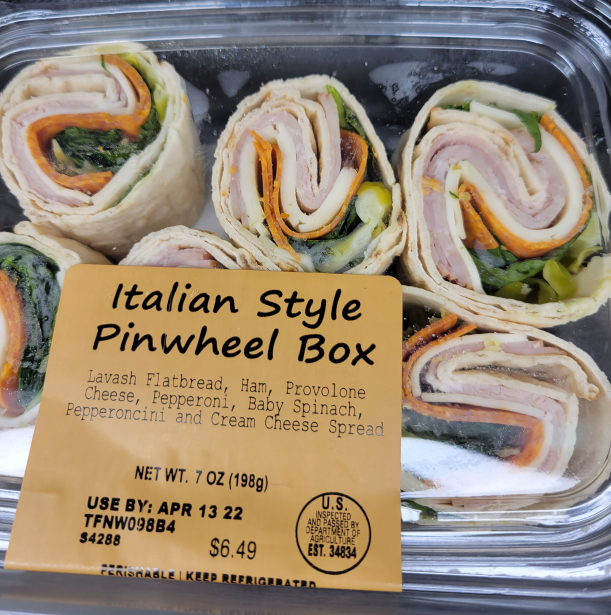
I walked into a local Safeway, CERTAIN there would be some, and I was rewarded for this faith.
It was the only one left in the deli section, so I was cutting it pretty close, but still.
The Puff Pastry form (which desperately begs for a distinguishing name from its cold counterpart, maybe “baked pinwheel” or “hot” pinwheel?) is nigh identical in initial execution: a sheet of puff pastry, thin layers of filling, tightly rolled into a spiral, and cut into disks. The difference is that then you bake the puff-pastry version, meaning that the fillings tend to be a little more heat-resistant. A common “cold” pinwheel filling, for instance, is Turkey and Cranberry, consisting of deli turkey, cream cheese, and a cranberry sauce. Such a filling would dissolve out of a baked pinwheel during, which more commonly use more heat-resistant ingredients. Baked pinwheels (which are often served at room temperature, which is why I have not repeated the name since suggesting it) tend to consist of a single meat and some cheddar cheese, or a sauce or seasoning and cheese. “Pesto Parmesan Pinwheels”, “Ham and Cheddar Pinwheels”, “Pimento Cheese Pinwheels’, Pizza Pinwheels. Hell, someone’s made Taco Pinwheels, which feels somehow transgressive to make the taco version of the dish the one that DOESN’T use tortillas.
Anywho, as noted, the recipe is foundationally quite basic, even if the flavor combination might be a little unusual for most Americans: as we’ve noted before, Korea LOVES putting Cheese on things, so “Gochujang and Cheddar” is not a strange flavor pairing at all for them. This is technically the longer of the two recipes, but I assure you, it will not feel that way. That’s because you’ve got to chill the rolled product to keep the puff pastry firm. So you’ll spend about 15-20 minutes on the first few steps, and then you can toss it in the fridge for at least an hour, and up to 2 days, before finished with about 8 minutes of work and 20 minutes of baking. That’s some solid make-ahead potential. But enough talk, let’s get going.
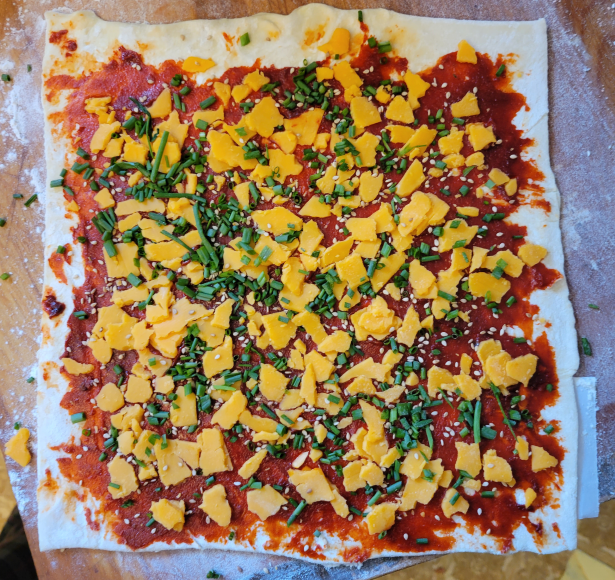
You’re going to want to roll out the puff pastry just a little, once it’s thawed and on a floured surface. This helps ensure that it’s square, works out any little cracks or imperfections from when it was made, and so on. Onto that, you’re going to smear some gochujang. The recipe calls for 2 tbsps, but I think I pushed that up to 3, as it was just a little too difficult to smear those 2 tbsps across the whole thing. Maybe if I had a smaller offset spatula, or I had shaken off the flour before starting.
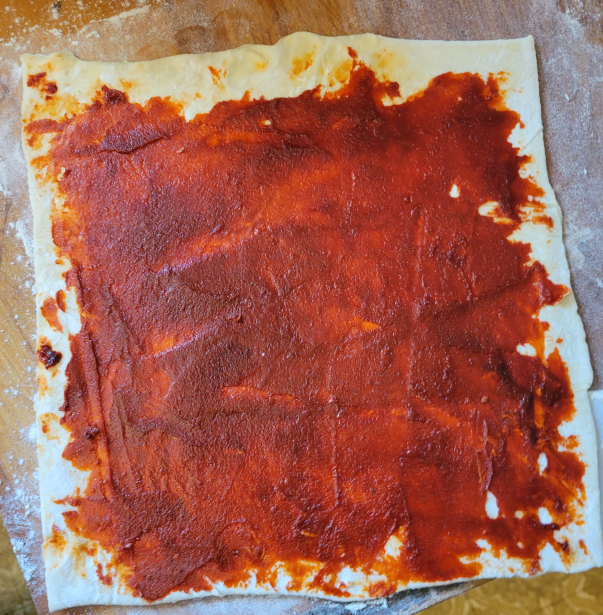
This could be a Rothko. You don’t know.
Nor do I. Rothko might be the wrong guy.
You wanna leave a gap on the top, since that’ll be the edge that seals the pinwheel, and you’re going to trim the sides off, so don’t push yourself too hard on those. Over the gochujang, sprinkle some shredded Cheddar cheese, or, like me, you can crumble some slices of cheddar cheese, because apparently we don’t have shredded cheddar in the house. Sprinkle over some thinly sliced chives, and some sesame seeds, and you’ve got something that looks like a promising start to a pizza.
Spread some thinly sliced beef over that sucker, you got yourself a deal.
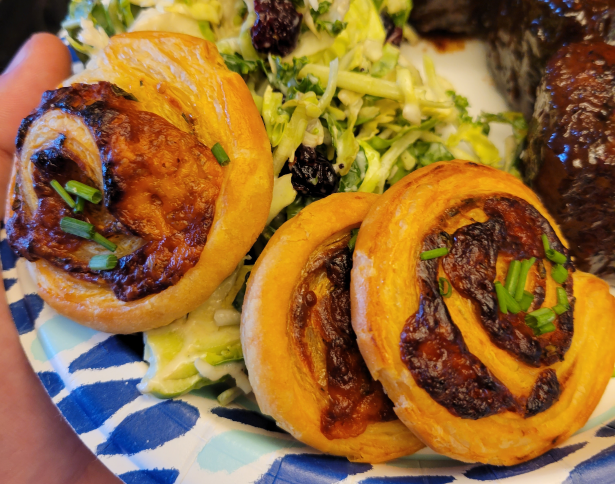
Then just take the bottom edge, roll the whole thing up, roll up in plastic wrap, and pop into the fridge for later. About 30-40 minutes before you want to serve them, preheat your oven, set up a weird nested baking sheet situation, with a parchment-paper-lined rimmed baking sheet…on top of another equally sized baking sheet. (I SAY “weird”, but honestly, I immediately understood the purpose of the device: it’s a dry bain marie. The bottom baking sheet is going to absorb most of the heat, keeping the bottoms of the pinwheels from burning. Speaking of, slice your rolled-up dough-wheel into ½” slices, after trimming up the ends. Mathematically, you should end up with around 18 pinwheels. Lay them on the parchment paper, brush them with a little egg wash, and bake for around 15 minutes. Once nice and browned, move them to a wire rack to cool, and finish with a sprinkle of more sliced chives.
I acknowledge that I skipped picturing what likely feels like the hardest part: the rolling and slicing, but I assure you, it’s much simpler than you’re mentally making it.
That’s the EASY one, though. Let’s work on something a little harder, and maybe a little easier to sell to your family as Easter-Appropriate.
California Knows How To Party.
So, Sour Cream and Onion bicuits, so named because you make biscuits with, and get this: sour cream, and green onion. Which is, interestingly, the onion in “sour cream and onion”…maybe. This is one of those situations where it’s hard to know who was doing what when. See, Sour Cream and Onion chips didn’t show up until the 60’s or 70’s. Which was AFTER the hey-day of “California Dip”, a party dip of the 50’s consisting of Lipton’s Onion Soup mix blended through sour cream. IS that the inspiration of the flavor, or does it derive from the combination of sour cream and chives on baked potatoes? On chips, at least, they sometimes use dehydrated green onion to get the signature green flecks, but other times that’s parsley, and whether or not i’s a big part of the FLAVOR profile, or if they rely more on onion powder and the same backbone of the California dip, is up for question. However, the basic idea for these remains kind of the same as the chips: take a relatively plain starch, and punch it up both visually and flavor-wise, with the addition of onion bits. Thus, it should be of little surprise that this recipe is essentially a standard biscuit recipe, except with some green onions worked through it, and, when you would normally start adding milk to bring the dough together, you instead add sour cream. So the first thing you gotta do is slice up some green onions.
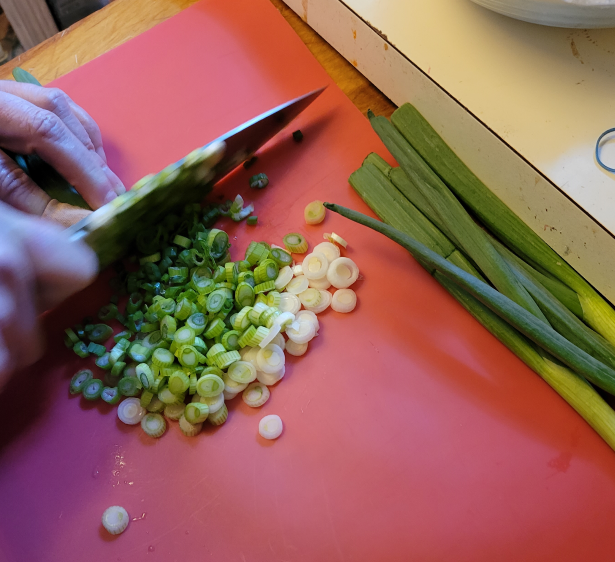
Who knew that onions would be such a key ingredient?
From there, make a biscuit mix: combine flour, baking powder and baking soda, salt and pepper, and some sugar in a large bowl. I will note now that this is a Bon Appetit recipe, meaning it’s fairly precise on its salt measurements (not as precise, as a man I discussed the recipe with in a bar noted, as giving you a measurement of WEIGHT for the salt, but pretty good), suggesting 2.5 tsps if you’re using Diamond Crystal Kosher Salt, and 1.5 tsps of Morton Kosher. We only had Morton Coarse Kosher, which I did not know how to convert for. I know the rough estimate for going from table salt to kosher is 1:2 (for every 1 tsp of table salt, you need 2 tsps of kosher salt for the same amount of saltiness), and I think I under-salted. I aimed for around 2.25 tsps, and I could maybe go all the way to 3. Further experimentation will be needed.
To the dry mix, you’re going to do the basic “rub-in” method with 10 tbsps of unsalted butter. Cut the butter into cubes, toss in the biscuit mix to coat, and then work flour into the butter with your fingers, until the butter is broken up into pea-size pieces and thin shards. This is one of those “easier said than done” steps, where the process will likely take about 5-6 minutes. Then toss in your green onions and mix them around to distribute them.
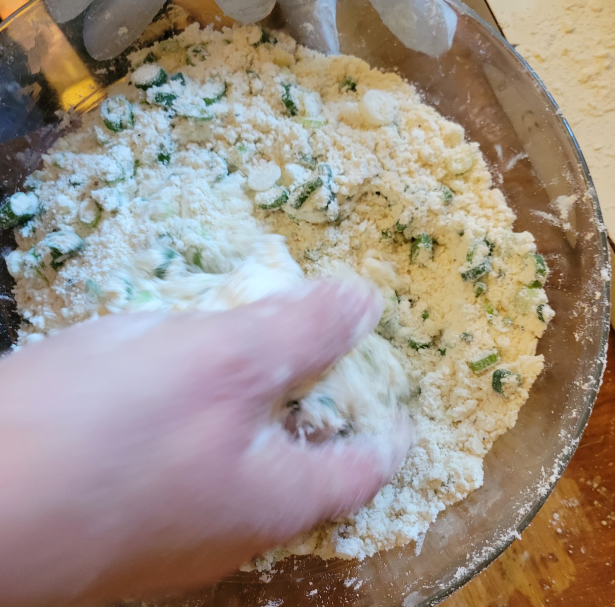
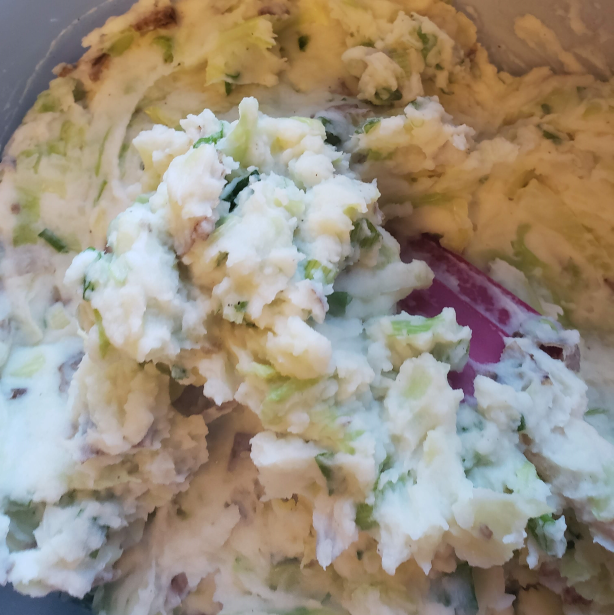
Probably the weakest picture of today’s post. Maybe the book one. I forgot to get more contrast in both of them.
To that mixture, you’ll want to add 1.25 cups of sour cream. This won’t seem like enough, but I assure you, this is supposed to be a fairly dry dough. Like, the video on the site shows it like, ¼ still loose and dry when it’s turned out onto the cutting board to knead. A couple minutes of work, and it will come together, especially after we apply the letter-fold technique. See, biscuits are supposed to have a lot of flaky layers, which recipes achieve in various ways. This one does so by literally forcing the dough into layers: once your dough is kneaded into something that’s like, 90% cohesive and formed into a rectangle about 8” by 4”, you’re going to fold it “like a letter”, taking one 4” long edge, and folding it so it covers the middle third of the dough, and then folding the opposite end over the newly folded edge. This is one of those things that’s easier SHOWN than said

…THEORETICALLY easier shown than said.
Do that, work the dough back to the same rough 8” by 4” rectangle, and repeat. Boom, you’ve naturally built 9 layers into the dough. If you want to be a super chef/are working with much richer dough meant for things like kouign-amann or croissants, you would KEEP DOING THIS a couple times, making 27 layers, then 81, then 243. But 9 is fine. Shape your rectangle one last time, and cut it into 8 two inch by two-inch squares. Place those on a parchment-paper lined baking sheet, brush with some melted butter and sprinkle with some flaky sea salt, and get in an oven. Bake for around 20 minutes, and then boom, you’re done. You’ve made sour cream and onion biscuits!

It’s amazing how good these look, and I will somehow still whine about their look in a second. (I think what happened is that, when I took them out of the oven, I was disappointed because there was a lot of darker browns around the oven, but they look much better next to paler things.)
The results are pretty damn good. Not 100% amazing: In my personal opinion, the bottoms are just a touch over-browned, and the tops not quite browned enough. As I mentioned, I think they could use a touch more salt, not because I want to nail the very salty flavor of the chips, but because I found them a little muted in flavor, and I assume that’s a matter of under-seasoning. Still, they LOOK really nice, and would not be out of place at most Easter spreads I’ve eaten at, and some of the bites of them really deliver on the promise of a lighter, more vegetal biscuit experience. I highly recommend you try either recipe, or both for this coming Easter.
THURSDAY: I’M DEFINITELY PUSHING BACK LAST WEEK’S POST, SO LET ME SEE WHAT I CAN WHIP UP. SALT EXPERIMENTS? A TASTING? I DON’T KNOW, MY SCHEDULE IS STILL SOMETHING OF A MESS.
MONDAY: I MAKE A VERY DIFFERENT KIND OF “BREAD”, IN HONOR OF MY OTHER BROTHER’S BIRTHDAY. BECAUSE I ACTUALLY DIDN’T MAKE THIS ONE, HE DID. BUT I’M ALMOST CERTAINLY NOT GOING TO CONVINCE HIM TO WRITE IT UP, SO YOU AND I CAN TALK ABOUT IT.
Recipes
Gochujang and Cheddar Pinwheels
Makes ~18 pinwheels
Ingredients
1 9” by 9-1/2” sheet puff pastry, thawed
2 tbsp gochujang
2 ounces shredded cheddar cheese
1 tbsp sesame seeds
3 tbsps chives, thinly sliced (2 tbsp to start)
Egg wash (1 large egg + 1 tbsp water, beaten together in a small bowl)
Preparation
On a lightly floured surface, roll out the puff pastry just a little bit, until it forms a 10” by 10” square. Spread the gochujang over the top of the pastry, leaving a ½” border clear on the far edge to serve as a seam. Evenly spread the cheese, sesame seeds, and 2 tbsps of chives over the gochujang. Lightly press down the toppings with a rolling pin.
Roll puff pastry, starting with edge closest to you, finishing by pinching seam to seal. Roll in plastic wrap and refrigerate for at least 1 hour and up to 2 days.
Preheat oven to 400 degrees and stack a rimmed baking sheet inside another rimmed baking sheet, and line the top one with parchment paper. When oven is ready, take your pinwheel roll from the fridge, trim the edges, and cut into ½” slices. Place on the parchment paper, and brush with egg-wash.
Bake for 14-16 minutes. When nicely browned, move to a wire rack to cool for 5 minutes, sprinkling with remaining 1 tbsp of sliced chives.
Sour Cream and Onion Biscuits
Makes 8 biscuits
Ingredients
Biscuit Mix
8 scallions, roots trimmed
10 Tbsp. chilled unsalted butter
2 ½ tsp. Diamond Crystal or 1½ tsp. Morton kosher salt
1 tsp. freshly ground black pepper
1¾ tsp. baking powder
½ tsp. baking soda
1¼ tsp. sugar
2½ cups (313 g) all-purpose flour, plus more for surface
1¼ cups sour cream
Finishing elements
2 tbsp unsalted butter, melted
Flaky sea salt
Preparation
Start by doing some basic chopping: thinly slice your scallions, and chop the 10 tbsps of butter into ½” cubes. Preheat your oven to 425 degrees, and line a baking sheet with parchment paper.
In a large bowl, whisk together salt, pepper, baking powder, baking soda, sugar, and flour. Rub-in the cubed butter, until butter is broken down into pea-sized cubes. Add sliced green onions, and toss to coat in flour. Add in sour cream, and stir into mixture with a fork, until large shaggy clumps form.
Turn out onto floured work surface, and knead 3-4 times, ensuring all dry bits are worked into the dough as a whole. Shape into an 8” by 4” rectangle that should be roughly 1” tall. If not…I don’t know, man, you used too much or too little of something.
Begin “letter folding”, taking one edge, and folding it until it has covered the middle section, leaving 1/3rd exposed, and then taking the exposed length, and folding it on top. Shape into another 8x4 rectangle, and repeat the process.
Cut into 8 2” by 2” bicuits, by cutting the rectangle lengthwise down the middle, and then cutting the remaining strips of dough into quarters. Place onto the parchment paper, brush with butter, and sprinkle the top with sea salt.
Bake for 18-22 minutes, serve warm with butter, or more sour cream.